Showing posts with label tutorials. Show all posts

May 10, 2013

Homemade Yogurt Tutorial {Regular or Greek}

Making yogurt can seem intimidating. Kinda like 'fessing up to your husband that you ate the last piece of his dark chocolate--and you better believe I know something about that! 

It really is simple, and it is outrageously inexpensive compared to the little 6 oz. tubs that you buy from the store for a $1 each.   Based on a $3 gallon of milk and a $1 starter, you can make at least 12 servings of Greek yogurt for no more than $.33 each!  That's a savings of nearly 70%!

Homemade Greek yogurt with strawberries and raw honey

Here's what you need: 

  1. A gallon ( or however much you want) of milk - the higher the percentage of fat, the creamier the yogurt.
  2. 2-3 tablespoons of plain yogurt, also referred to as the starter


110-115 degrees -- the perfect temperature for live yogurt cultures to marry and proliferate


In a nutshell:

  1. Heat the milk to just below a simmer.
  2. Let the milk cool to lukewarm.
  3. Add the starter and stir to combine.
  4. Let the milk/yogurt sit covered and undisturbed in a warm place for 8-12 hours.
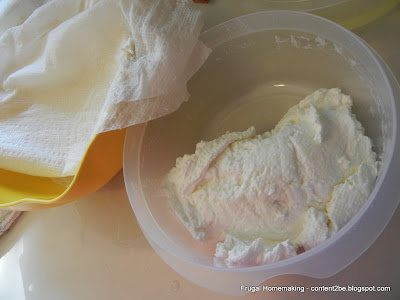
  5. For thicker Greek yogurt, strain in a lined colander for an hour or two to separate the whey from the yogurt. 


My strained Greek yogurt - I do mine in batches because my colander isn't very large.

And here are the detailed instructions:

  1. In a large pot, heat the milk over medium heat until the milk starts to get little foamy bubbles around the edge of the pot, just below boiling.  If you use a candy thermometer, you want to reach 180 degrees.  This denatures the milk, creating a better textured yogurt.  If you want the whys and wherefores for doing this, check this article out.
  2. Allow the milk to cool to lukewarm, which is around 110-115 degrees.  If the milk is too warm when you add the starter, it will kill off the live bacteria. 
  3. Add a half cup of the warm milk to the starter, stirring to combine.  Add the starter mixture to the lukewarm milk.  
  4. Cover the pot with the lid, then place the pot wrapped in a bath towel in the oven or some other warm place.  I turned my oven onto its lowest setting for about 3 minutes, then shut it off before putting the pot in.  You just want the yogurt to incubate in a semi-warm place. I've read that others just leave their oven light on.
  5. Allow the yogurt to sit for 8-12 hours and culture.  The longer you allow the yogurt to sit, the more sour it will be.
  6. Homemade yogurt is usually more runny but less sour than the store-bought counterpart.  To make Greek yogurt, line a colander with a paper towel or a coffee filter.  Pour the yogurt into the colander and allow to sit for an hour or two.  I cover the yogurt with another wet paper towel and put a couple of dessert plates on top to create a little pressure and speed up the separation process.  The longer it sits, the thicker the yogurt will be. In my experience, after an hour, the yogurt will be about the consistency of store bought; after 2 hours, it's like Greek yogurt.
  7. You can sweeten the yogurt at step #3 if you want it all to be sweet, or you can sweeten individual servings.  
Leftover whey from straining

If you're wondering what to do with all the leftover whey, here and here are an excellent collection of tips.  FYI: I tried making ricotta cheese from whey, and it did NOT work for me.  I did make this healthy lemonade recipe that uses whey, and my family had no idea it was made with anything out of the ordinary.

This yogurt will stay good for 7-10 days, and possibly even as long as 2 weeks.

Mar 28, 2013

Homemade Peppermint Honey Lip Balm

Did you know that your skin is the largest organ of the body?  And what you put on it is absorbed into the body-- in fact, many medicines today are available as skin patches for those who can't swallow pills or tolerate shots.

One thing I have been considering lately is the lotion, soaps, and moisturizers that I use on a regular basis.  Here's a tedious but well-documented article on the dangers of just one of the chemicals used regularly in toiletry products, sodium lauryl sulfate or SLS.  While I'm not ready to turn all-out crunchy anytime soon, it's a little hard to deny that there may be some wisdom in avoiding it when possible.

Have your tins all ready for pouring before you begin the melting process.  The balm hardens quickly.

I was super excited about making my own lip balm.  I actually volunteered to make it as a favor for our church's ladies retreat back in November.  I had all of the supplies on hand, excepting the salve tins, so it was way inexpensive.  If you don't have the supplies on hand, the beeswax is probaby the most difficult to find, but you can order some from eBay very reasonably.  The honey, coconut oil and lanolin (find it in the baby aisle!) are available at most grocery stores, and the peppermint oil is available at a craft store like Hobby Lobby with the candy-making supplies.


Plop the coconut oil, lanolin and beeswax in the top pan of a double boiler, or if you're like me, just rest an oven-safe bowl (preferably with a pour spout) on top of a smallish pot with a bit of simmering water in it.


Over a medium-low heat, melt it all down.


The beeswax will be the last to melt and incorporate.  Because the mixture is a little messy to clean up, I recommend using something small and simple to clean, like the handle end of a wooden spoon.


All melted!


Quickly add the honey and peppermint oil, whisking constantly, and begin to pour into your containers as soon as it is incorporated.  The honey does not mix well with the oils, so I had to stir constantly while pouring into the tins.  If you have two people, this step may be a little easier.  I didn't get any pictures of this step, because I needed both hands.

All done!


Peppermint Honey Lip Balm
7 tbsp. coconut oil
1 tbsp. lanolin
3 tbsp. beeswax
1-1/2 tbsp. honey
30 drops peppermint essential oil

Melt the coconut oil, lanolin, and beeswax over low-medium heat in a double boiler. Once melted, remove from heat and quickly add the honey and peppermint oil and stir until incorporated.  Immediately pour into tins.

The stats:
Time: 15-20 minutes
Cost: about $.88 per tin
Yield: 12-15 tins (probably about 1 oz. tins)

Feb 22, 2013

Homemade Gak {Slimey Science Fun}


Many of the Christmas gifts we gave last year were homemade, and this fun science experiment and texture toy was one of them. The girls and I had a lot of fun making gak for their boy cousins. It is kind of a cross between slime and Silly Putty--not as dry or firm as Silly Putty, but not quite as gooey as slime.  The properties of this stuff make it a lot of fun to play with.  You can shape it, break it off,  pour it, make noises with it...noises that little boys find quite funny. Of course, after my girls had such fun making it, they wanted some of their own.  We made theirs in pink of course.

Dump in (2) 4 oz. bottles of Elmer's glue --I used the regular washable Elmer's school glue. Fill the empty glue bottles with water; swish it around and dump it in with the glue.  Add a few drops of food coloring for a little excitement. The girls loved stirring in the food coloring.

In a measuring cup, add a teaspoon of borax to a 1/2 cup of warm water.  Stir well.  Add the borax water to the glue.   Borax can be found near the laundry and detergent products in most grocery stores.
 At first, you will think you have done something wrong because the mixture will be stringy and watery.  Keep working it.  I ended up using my hands as it seemed to be the easiest way to mix it evenly.
Eventually, the mixture will coagulate.  It can take 5 minutes or so.

 Squish it. Squash it.
 Shape it. 
 Our full product line.  We used empty peanut butter jars to store it.

If you're interested in some of the science and history of the stuff, check out Steve Spangler's Science Experiments.  He has a lot of other fun, simple science experiments that you can try out with your kids!

If you're concerned about the use of Borax in a child's play mix, you can read this well-balanced article on the properties of  borax.  Personally, I don't have a problem with it.

Mar 15, 2012

Girl's Tutu Skirt {A Tutorial}

Grace is all about princesses and ballerinas right now.  She has been asking me for a poufy skirt, so yesterday during their nap I sewed this up.  It took about 2 hours, but I wasn't being super precise or meticulous.

Supplies for a size 3 tutu skirt:
Fabric: 60" x 19" rectangle (I cut up an old sheet!)
Tulle: 120" x 48" width of the bolt (I have an entire bolt of tulle from my wedding 7 years ago.)
1" wide Elastic: 20" (or measure of the child's waist minus one inch)

  • Cut tulle in half length wise; if the tulle was folded in half on the bolt, just cut along the fold line.  You'll end up with two rectangles approximately 120" x 24".  
  • Fold 1 tulle rectangle in half length wise; you will end up with a doubled piece measuring 120" x 12".
  • Sew a basting stitch along the entire length of the selvages (the open side, not the folded side) and gather till the rectangle measures 60" x 12".  
  • Pin to fabric rectangle so bottom of tulle and fabric are even and sew. (see photo below)
  • Cut remaining tulle rectangle length wise into two more rectangles, measuring 120" x 15" and 120" x 9".
  • Fold each rectangle in half length wise, sew a basting stitch along the length of the selvage, and gather till the length is 60".  One doubled rectangle will measure 7.5" wide, the other will measure 4.5" wide.
  • Pin and sew the gathered 7.5" wide rectangle one inch above the previous tulle layer.
  • Pin and sew the gathered 4.5" wide rectangle one inch above the second tulle layer.
  • With right sides facing, sew the tulle and fabric rectangle along the width.
  • Fold down the top of the skirt 1.5", forming a casing.  Leave open an inch or so to thread the elastic.
  • Thread the elastic through the casing, sew the elastic together, sew shut the opening in the casing.


Feb 21, 2012

Homemade Liquid Hand Soap {Tutorial}

I was super excited about trying this frugal recipe for homemade liquid hand soap after seeing a pin from The Farmer's Nest detailing how to make my own.

This project was super easy, hands-on time was minimal, and it cost a grand total of $1.50 for a whole gallon of  soap. 

Supplies you need:
bar of soap, glycerin, squirt of dishwashing liquid, water
I found glycerin in the first aid section at Wal-Mart.  This 6 oz. bottle cost $2.99, but I only used 1/6 of the bottle.

Set a gallon of water (16 cups) on the stovetop on medium heat. I recommend a non-coated pot, since you may use your mixing beaters later on; the beaters may scratch the non-stick coating.

Meanwhile, grate the soap.  I used my kitchen grater and bowl. It's just soap, right?  Excuse the scaly claw there; I'm not sure who that belongs to, but they may need to check out a recipe for homemade lotion. Just a thought.


 My helper decided this looked like fun, so she jumped in on the fun.


Once the bar is grated, stir the soap shavings into the gallon of water.


Add 2 Tbsp. (1 oz.) of glycerin to the soap mixture and a squirt of (hand) dishwashing liquid.  The dishwashing liquid is only added to enhance the suds factor.


Immediately after the ingredients have been added, the water will look cloudy and thin.  Now just put the lid on your pot, and allow the compound to marinate for 12-18 hours. 


I made mine around 3 p.m.  At 10 o'clock that night, it was still very watery, so I continued to let it sit.  By 9 o'clock the next morning, the mixture had thickened to a gel-like solid.

You may not need to, but I had to use a mixer to slowly add water until the consistency is similar to hand soap.  


Bottle it up!


Note: The kind of bar soap you begin with may affect your final result.  From what I've read, Dove seems to cause problems with thickening.  Also, the glycerin additive is a humectant that helps the skin draw the moisture in.  You may be able to get by without it completely.

Linked up to Frugal Friday.

Feb 14, 2012

Valentine's Day Pop-Up Card {Tutorial}


I saw this sweet card on Pinterest and wanted to try my hand at recreating.  I started to click on the link to see if there were more detailed instructions, but the tab popped up with Chinese characters, so I just closed the browser down.  I was afraid it might be a virus.  I just used the illustration as shown, and dabbled till I got something close to what I wanted.

Here's what I did:

Open a new Word document.  Using Arial Black font, size 130, I typed "U" and "I".  Place cursor between U and I.  Type the U before I because you'll be cutting it from the back.
Step 1
To make the heart, go to Insert > Picture > AutoShapes > Basic Shapes (the button with the square, heart and triangle) > Heart Shape.
Step 3

In the drawing box that appears, just click and drag your cursor till you get a nice size heart shape.
Step 4

Crop the drawing box to tightly fit around the heart by grabbing the dark corners and sides of the drawing box. The box should settle itself nicely between the U and I.  The height of the heart should be 1.28" and width works well at 1.45"--format the heart by right-clicking withing the drawing box.
Step 4
For cutting, we just need the outline of the letters, so go to Edit > Select All.
Now go to Format > Font.  Click the "Outline" box.  Click  OK.
Step 6

Print page. Print on the back side of the paper.  I chose one of Grace's numerous works of art to print it on.

Employ your inner artist and draw the sides of the heart out so that each side touches the U and I.  Once cut, the heart will only be attached at the sides. Free-hand a smaller heart within your new heart shape.

Using a ruler, draw a line 3/8" above the top of the letters.  With the ruler, extend the top of the U and  I to meet the line.

Using the diagram pictured here, use an X-acto or very sharp utility knife to cut on every straight line, and fold on every dotted line. Note the bottom of the U and I are not cut, but folded. Be sure to protect your work surface from being cut through.  I just used a thick newspaper. 

Fold the letters first, then fold the card.  The card is folded in half at the point 3/8" higher than the bottom of the letters, along the straight cut around the heart.

 Cut the card to your desired dimensions.

Glue the back to a contrasting sheet of stock paper, being careful not to get glue on the letters.

This post is linked to Tute Tuesday and Tuesday Talent Show.

Feb 3, 2012

Child's Cardigan Tutorial {Upcycled Sweater}

I picked up this eyelet cardigan at a garage sale last summer for a buck.  It had a small rust stain on the shoulder, but I thought maybe I could dye it or just bum around the house in it.  But I just never really liked the way it lay--too boxy.  I've been purging the house lately, so I decided to get rid of it.  Then I thought that Grace sure could use a white cardigan, and this upcycled cardigan was born.

The original jersey knit sweater.

First, I cut off the sleeves.

Next, I used a shirt that fit Grace nicely to trace the bodice for the cardigan.  I added an extra 5/8" or so for seam allowances.

I then cut along the red pen lines.

My draftsmen.

First, I sewed the shoulders together.

*I failed to take a picture of cutting down the sleeves, but I cut the sleeves apart, laid them flat on top of on another.  I then cut them about 12 inches long with a gentle slope at the top, about two inches longer than the sides.  I determined the width of the sleeves by measuring the width of the arm openings in the bodice.  I determined the wrist size of the sleeve by measuring a long-sleeved shirt that fits well, and adding an 1-1/2" for ease and seam allowance.  I drew a line from the edge of the shoulder to the wrist to achieve a slightly tapered sleeve.

I pinned the re-cut sleeves at the shoulder.

I sewed the shoulders to the bodice.

I hemmed the sleeve at the wrist by folding it under and sewing.  The beauty of knit is that it doesn't ravel.

I pinned the sleeve seams and the side seams, and sewed them in one continuous seam.


 All done!  Grace wanted it long, or I would have hemmed the bottom of the cardigan too.  This was a pretty quick project.  I'd say about 2 hours maximum time, and the cost -- FREE!