Showing posts with label in the kitchen. Show all posts

May 10, 2013

Homemade Yogurt Tutorial {Regular or Greek}

Making yogurt can seem intimidating. Kinda like 'fessing up to your husband that you ate the last piece of his dark chocolate--and you better believe I know something about that! 

It really is simple, and it is outrageously inexpensive compared to the little 6 oz. tubs that you buy from the store for a $1 each.   Based on a $3 gallon of milk and a $1 starter, you can make at least 12 servings of Greek yogurt for no more than $.33 each!  That's a savings of nearly 70%!

Homemade Greek yogurt with strawberries and raw honey

Here's what you need: 

  1. A gallon ( or however much you want) of milk - the higher the percentage of fat, the creamier the yogurt.
  2. 2-3 tablespoons of plain yogurt, also referred to as the starter


110-115 degrees -- the perfect temperature for live yogurt cultures to marry and proliferate


In a nutshell:

  1. Heat the milk to just below a simmer.
  2. Let the milk cool to lukewarm.
  3. Add the starter and stir to combine.
  4. Let the milk/yogurt sit covered and undisturbed in a warm place for 8-12 hours.
  5. For thicker Greek yogurt, strain in a lined colander for an hour or two to separate the whey from the yogurt. 


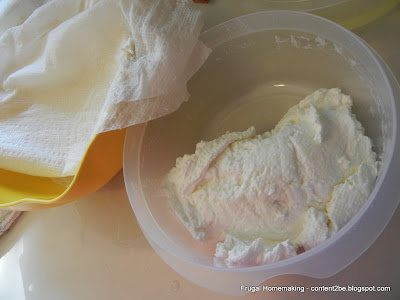
My strained Greek yogurt - I do mine in batches because my colander isn't very large.

And here are the detailed instructions:

  1. In a large pot, heat the milk over medium heat until the milk starts to get little foamy bubbles around the edge of the pot, just below boiling.  If you use a candy thermometer, you want to reach 180 degrees.  This denatures the milk, creating a better textured yogurt.  If you want the whys and wherefores for doing this, check this article out.
  2. Allow the milk to cool to lukewarm, which is around 110-115 degrees.  If the milk is too warm when you add the starter, it will kill off the live bacteria. 
  3. Add a half cup of the warm milk to the starter, stirring to combine.  Add the starter mixture to the lukewarm milk.  
  4. Cover the pot with the lid, then place the pot wrapped in a bath towel in the oven or some other warm place.  I turned my oven onto its lowest setting for about 3 minutes, then shut it off before putting the pot in.  You just want the yogurt to incubate in a semi-warm place. I've read that others just leave their oven light on.
  5. Allow the yogurt to sit for 8-12 hours and culture.  The longer you allow the yogurt to sit, the more sour it will be.
  6. Homemade yogurt is usually more runny but less sour than the store-bought counterpart.  To make Greek yogurt, line a colander with a paper towel or a coffee filter.  Pour the yogurt into the colander and allow to sit for an hour or two.  I cover the yogurt with another wet paper towel and put a couple of dessert plates on top to create a little pressure and speed up the separation process.  The longer it sits, the thicker the yogurt will be. In my experience, after an hour, the yogurt will be about the consistency of store bought; after 2 hours, it's like Greek yogurt.
  7. You can sweeten the yogurt at step #3 if you want it all to be sweet, or you can sweeten individual servings.  
Leftover whey from straining

If you're wondering what to do with all the leftover whey, here and here are an excellent collection of tips.  FYI: I tried making ricotta cheese from whey, and it did NOT work for me.  I did make this healthy lemonade recipe that uses whey, and my family had no idea it was made with anything out of the ordinary.

This yogurt will stay good for 7-10 days, and possibly even as long as 2 weeks.

Mar 28, 2013

Homemade Peppermint Honey Lip Balm

Did you know that your skin is the largest organ of the body?  And what you put on it is absorbed into the body-- in fact, many medicines today are available as skin patches for those who can't swallow pills or tolerate shots.

One thing I have been considering lately is the lotion, soaps, and moisturizers that I use on a regular basis.  Here's a tedious but well-documented article on the dangers of just one of the chemicals used regularly in toiletry products, sodium lauryl sulfate or SLS.  While I'm not ready to turn all-out crunchy anytime soon, it's a little hard to deny that there may be some wisdom in avoiding it when possible.

Have your tins all ready for pouring before you begin the melting process.  The balm hardens quickly.

I was super excited about making my own lip balm.  I actually volunteered to make it as a favor for our church's ladies retreat back in November.  I had all of the supplies on hand, excepting the salve tins, so it was way inexpensive.  If you don't have the supplies on hand, the beeswax is probaby the most difficult to find, but you can order some from eBay very reasonably.  The honey, coconut oil and lanolin (find it in the baby aisle!) are available at most grocery stores, and the peppermint oil is available at a craft store like Hobby Lobby with the candy-making supplies.


Plop the coconut oil, lanolin and beeswax in the top pan of a double boiler, or if you're like me, just rest an oven-safe bowl (preferably with a pour spout) on top of a smallish pot with a bit of simmering water in it.


Over a medium-low heat, melt it all down.


The beeswax will be the last to melt and incorporate.  Because the mixture is a little messy to clean up, I recommend using something small and simple to clean, like the handle end of a wooden spoon.


All melted!


Quickly add the honey and peppermint oil, whisking constantly, and begin to pour into your containers as soon as it is incorporated.  The honey does not mix well with the oils, so I had to stir constantly while pouring into the tins.  If you have two people, this step may be a little easier.  I didn't get any pictures of this step, because I needed both hands.

All done!


Peppermint Honey Lip Balm
7 tbsp. coconut oil
1 tbsp. lanolin
3 tbsp. beeswax
1-1/2 tbsp. honey
30 drops peppermint essential oil

Melt the coconut oil, lanolin, and beeswax over low-medium heat in a double boiler. Once melted, remove from heat and quickly add the honey and peppermint oil and stir until incorporated.  Immediately pour into tins.

The stats:
Time: 15-20 minutes
Cost: about $.88 per tin
Yield: 12-15 tins (probably about 1 oz. tins)

Nov 2, 2012

Apples and Pears and Pies, Oh My!

Back in September, I picked up 20 lbs. of pears at Aldi's for $.49/lb.  I made a bunch of pear sauce for the family and as baby food in the future.


  I used my new-to-me Vita-Mix blender.  I love this appliance. Seriously, calling a Vita-Mix just a blender is like calling the Grand Canyon just a hole in the ground. UH-MAZING.  It can make nut butter, hot soups and even ice cream!

I wanted to make pear sauce, but I dreaded peeling 20 lbs. of pears and it bothered me that the skins, which are so nutritious, would be wasted.  I decided to try using the Vita-Mix to blend the skins well enough to be undetectable.  Sure enough, the texture is so smooth, you would never know the skins were left on.


This thing does not mess around.  I sliced off a nice chunk of the tamper (seen in the background) once by using it without the lid and it got too close to the blades. Ben says it sounds like we're at the Indy 500 when it is running full-tilt! 

Pear sauce, canned and cooling

Apples, cored and sliced, ready to make applesauce and apple butter

Applesauce, canned and cooling

Apples - sliced, cored, peeled, and frozen - ready for a last-minute apple pie or crisp!

Apple peels from pie filling, boiling, to be added to the apple butter

Crock-pot Apple Butter, thick and spiced

Apple crisp

Apple pie, at husband's request

Pie, sliced and creamed

Jul 27, 2012

Big Batch Blueberry Muffins {Fill Your Freezer!}

If you pack breakfasts for children or a spouse, or your family is frequently on the go, then you're gonna love this mega-batch muffin recipe!  I have been packing my husband's breakfast and lunch for 7 years now, and honestly, I like it no more now than I did 7 years ago.  I have, however, learned a few tricks and tips to make the meal assembly a little snappier.  One of those tricks is freezing big batches of muffins for breakfast. I then bag them by twos in sandwich bags and store them all in large gallon size Ziploc bags in the freezer.
The thing that I love most about this recipe is that almost all of the ingredient's measurements are in full cups and teaspoons, so just a couple utensils gets used for the entire recipe!


For about the first 4 years of our marriage, Ben took a package of  Pop-tarts for breakfast every weekday.   After a series of intense number crunching, I deduced that he could eat a more healthful (and tastier, in my opinion) breakfast and I could save a sizable bit of change by baking muffins for him to take instead.  So over the past three years I have done a LOT of baking, to the tune of about 1500 muffins!

Blueberry muffins are awesome, but unless you buy blueberries in season, they are too pricey.  My strategy:  Aldi has a $.99 cent/pint sale every July.  I buy a bunch, like 15-20 pints, then pour them straight from the pint into a resealable sandwich bag.  I freeze them, then throw the sandwich bags into gallon-size freezer bags for manageability.  When I want to make a batch, I pull them out, rinse them clean in cold water in a colander, and toss them still frozen into my muffin batter.

Sift together the flour, sugar, baking powder, and salt.


Combine the oil, milk, and beaten eggs in a separate bowl.

Add the egg mixture to the dry ingredients and stir just until moistened and batter is still lumpy.  Gently fold in the blueberries.

Spoon into muffin cups until about three-quarters full.  Bake at 400 degrees for 18 minutes.


Big Batch Blueberry Muffins
Makes 42-48 muffins

Ingredients:
7 cups flour
2 cups sugar
1/4 cup baking powder (or 12 teaspoons!)
2 teaspoons salt
4 beaten eggs
3 cups milk
1 cup oil
4 cups blueberries, fresh or frozen

Directions: 
Line muffin tins with baking cups.  Preheat oven to 400 degrees.  In a large bowl, combine dry ingredients: flour, sugar, baking powder, and salt.  In a medium size bowl, beat eggs.  Add milk and oil to beaten eggs, and stir to combine.  Pour egg mixture into flour mixture and stir just until moistened.  Gently fold in the blueberries. Spoon batter into lined muffin cups until 3/4 full.  Bake at 400 degrees for 18 minutes or until edges are golden.  Remove from oven and let muffins cool for 5 minutes before removing from tins.

Real Deal: about $5.10 for the entire batch or approximately $.11 per muffin (based on 48 muffins)

Jun 26, 2012

Strawberry Lemonade and Freeze Pops

The girls and I made these fun little freeze pops and strawberry lemonade last week.  It made a big batch of freeze pops which we are still happily slurping through.  The popsicles are tart, sweet and great for hot days. The leftover lemonade is just awesome for any day.

I made these using frozen lemonade concentrate, 16 oz. of frozen strawberries, 3 cups of water, and 1 cup of Diet 7Up (optional but adds lovely effervescence.)


First up, blend the strawberries with 2 cups of water. If your blender begins to cough, smoke, or otherwise indicate that it is unable to handle frozen strawberries, add the remaining cup of water.  Blend until smooth. Please note the quart canning jar that I'm using with my blender.  Canning jars (both quart and pint size) will fit most blenders, which is doubly awesome if you break your pitcher and you don't want to do extra dishes. Not that I broke my blender pitcher or anything like that...

If you want some strawberry chunks, take out 1/4 cup or so after the strawberries are chopped, but not smooth. I thought chunks added a little authenticity to our blend.


Mix the strawberries, lemonade concentrate, Diet 7Up, and remaining water in a pitcher.


Now the following step is optional, but if you have texture issues, you may want to do this.  If you let the mixture sit in your fridge for a couple of hours, the strawberry seeds will fall to the bottom of the pitcher, leaving a nearly seedless version.


Fill your freeze pop molds.  Go ahead and be jealous of my vintage Tupperware popsicle molds. I'll understand.


The remaining lemonade is irresistible.  It's a perfect slurry combo of sweet-tart, can't-stop-sipping yumminess.  I saved a pint or so for Ben, but by the time he got home, there was only about a cup left.  I really have no idea how that happened.


Freeze the molds for 4 or more hours.  Make your children's day and give them a popsicle before lunchtime.


Strawberry Lemonade Slurry and Freeze Pops
Makes about 2 quarts total

16 oz. frozen strawberries
12 oz. can of frozen lemonade concentrate
3 cups water
1 cup Diet 7Up or more water

In a blender, blend strawberries and water until smooth.  Add remaining ingredients in a pitcher and mix until combined.  Fill freeze pop mold and freeze for 4 or more hours.  

May 15, 2012

Blackberry Freezer Jam

So you all know how I'm avoiding sugar and flour.  Which, by the way, I haven't been doing that great at it for the past week.  It started with a batch of irresistible almond cookie dough and continued with a fun-filled road trip to Michigan, and is currently being maintained by a spoonful of blackberry freezer jam.


The jam happened like this.  Giant Eagle had a grand opening for their new store down the road.  Grand opening = rock bottom loss leaders, no?  Of course.  Case in point: 6 oz. package of blackberries only $1.  Ben ran in for a couple things while the girls and I snoozed in the car.  I said, "Can you pick up a couple containers of blackberries?" Amazing man, he picked up 5. Isn't that sweet? I love him.

Last night after church, I popped in a DVD from the library called "Hoarders: Season 1".  I thought, "Oh, this sounds interesting.  I've heard people say it's a bit addicting."  OH MY WORD.  Let me just say, I have done nothing but clean all. day. long. today.  Disgusting show. The basic premise is they go into the homes of people who have a hoarding disorder and help them address their condition and clean up the symptoms of said condition in two days.  Perhaps I need to purchase this series whenever I lack cleaning motivation.

*shudder*

The first show highlighted Jill, a woman who has a food hoarding disorder.  I choked back my gag reflex a number of times in horrified amazement at the hideous conditions this troubled woman was living under.  Literally under.

So...why am I talking about blackberries and the Hoarders show in the same post?  Well, that trip to the grand opening was 2 weeks ago, and those blackberries were starting to shrivel. Shriveling is the closest I want to come to the conditions Jill was living in.  It was the last thought on my mind before I fell asleep and the first one when I woke up.  Blackberry freezer jam made it on my MIT (most important task) list today.  And judging by the spoon I licked unabashedly, it is delish.  I couldn't find a recipe for the exact proportion of blackberries I had, so I adjusted and winged it.  The one thing I really like about it is that the jam was thick, an absolute anomaly with freezer jam, which is notoriously soft-setting.


Blackberry Freezer Jam
Ingredients:
4 - 6 oz. clamshells blackberries (approximately 2 cups crushed)
3-1/2 cups sugar
3/4 cup water
1 box fruit pectin (Sure-Jell, Ball, Certo)
2 Tbsp. lime juice

Directions:
Crush the blackberries with a potato masher, about 1/2 cup at a time.  In a large bowl, combine the blackberries and sugar, and stir until well combined.  In a separate saucepan, dissolve the pectin in the water.  Bring to a boil.  Allow it to boil hard for one minute, stirring constantly.  Add lime juice.  Pour pectin water over the blackberries/sugar and mix well.  Stir for about 3 minutes or until the sugar crystals are pretty much dissolved.  Immediately pour jam into freezer jars or jam jars.  If putting in the freezer, leave headspace for expansion.  Makes about 5-1/2 cups.


Apr 29, 2012

Menu Plan April 30 - May 6


Breakfast and Lunch menu
Meatloaf sandwiches, baked potatoes, fruit salad
Spaghetti, garlic bread, broccoli
Parmesan Pork Chops, roasted carrot fries and cauliflower
Mushroom and Ham Frittata, applesauce
Taco Chicken (new recipe!), cucumber salad
Taco salad, sliced apples
Leftovers
Egg salad sandwiches, chips, pickles(didn't get to it last week)
Creamy Italian Crockpot Chicken, garden salad, rolls
Eggs, English muffins


Mar 20, 2012

Roasted Cauliflower

Smoke-a-rooni!  You have got to try this, folks.  I have read here and there that roasting veggies brings out their natural sugars, resulting in a mellow, tender vegetable dish that even kids love.  Since following my new eating lifestyle, I've been enjoying some awesome, new-to-me recipes. This one has been the best...like eaten it three times in one week, best.

I made this for myself one night when I didn't want to eat the main entree for dinner--mac'n'cheese.  I didn't time it well, and everyone else had finished dinner before mine was prepared.  The girls were playing in the living room, when I sat down on the couch with the plate in the picture below.  Suddenly, the girls were on my lap trying to inhale my dinner.  I don't mess around when it comes to food. No siree. I called in the reinforcements.  Ben came and hauled them away, but not before they grabbed a few florets a piece.  Considering that we nearly have to force-feed vegetable to my little munchkins, clearly these tender morsels are delicious.

Doesn't it look divine?  I'm telling you. It was. Every last bit.

Roasted Cauliflower
Serves 4

1 head of cauliflower, washed and broken into bite-size florets
Salt, about 1/2 tsp.
Garlic powder, about 1/2 tsp.
Parmesan cheese, about 1/4 cup
Cooking spray

Directions: Preheat oven to 400 degrees. Cover a cookie sheet with aluminum foil, then spray the foil well with cooking spray.  Spread the cauliflower over the sheet. It's fine if they touch, as long as they are not on top of each other.  Spray the cauliflower with the baking spray, evenly coating.  Alternatively, you could put the cauliflower in a resealable bag with a tablespoon of oil and shake until evenly coated.  Lightly sprinkle salt and garlic powder over the cauliflower.  Bake for 25 minutes.
After 25 minutes, remove the sheet from the oven.  Sprinkle Parmesan cheese on top of cauliflower.  Put back in the oven for 5 more minutes. Remove from the oven and serve.

Mar 17, 2012

A Lucky Breakfast {Shamrock Pancakes}


I used a regular pancake recipe with a bit of green food coloring thrown in.  I had an old squeeze bottle with a large hole to shape the shamrocks.  It's harder than you think!


Eating with her fingers!?! Where is her mother?!

Feb 15, 2012

Leftover Mashed Potato Chowder {cheesy veggie soup}

I fully intended to make this recipe this week, but then I realized I had a bunch of leftover mashed potatoes.  I wondered, "Hmmm...I wonder if I could use that as a substitute for a white sauce."


Well, I did, and it was a great way to use up a load of mashed potatoes.  I threw in some leftover crumbled sausage to satisfy the meat lover in our house.

Leftover Mashed Potato Soup
Serves 4-6

Ingredients:
1 Tbsp. butter
1/2 cup diced onions
1 cup carrots, finely shredded
2 cups water or chicken broth
2-3 cups mashed potatoes
16 oz. frozen broccoli
4 oz. bulk sausage or bacon, crumbled
1 tsp. salt
1/4 tsp. garlic powder
1-1/2 cups shredded cheddar cheese

Directions: Over medium heat, saute onions and garlic powder in melted butter.  Add shredded carrots and water and bring to a simmer.  Add mashed potatoes, stirring till potatoes are no longer clumped.  Use a potato masher to dissolve any clumps.  Add frozen broccoli and sausage and simmer 10 minutes.  Add salt and shredded cheese, stirring until cheese if fully incorporated. Serve with warm rolls.

Feb 11, 2012

The Perfect Omelet

As a kid, I loved eggs served over easy.  There was just something so fun about that runny yolk.  Like legal-play-with-your-food fun.  Somewhere around the age of 15, I suddenly discovered that it was disgusting to eat a runny yolk.  It's like eating slime or snot or something like that.  Plus, if you don't wash the plate immediately, it hardens onto the plate like some kind of mutant rock element. I think I may actually be a little nauseated just thinking about runny yolks.

*shudder*

Anyways, a good omelet is a delightful, all-in-one meal, but I never could figure out how to cook them without the inside being quivery or the outside being brown.  Until recently.

Let me show you this magic trick.  It's really slick.  Seriously, your family will be impressed.

Perfect Omelet

  • Turn your oven to broil.
  • I use a 10" oven-safe, non-stick skillet, coated with cooking spray. 
  • Scramble 3 eggs, stirring in a dash of milk, and a dash of salt and pepper.
  • Pour into skillet.


  • Over low to medium heat, allow the egg mixture to cook until no longer opaque and the edges around the pan are semi-firm.


  •  Remove from heat and add any additional ingredients at this time.


  •  With oven rack in the middle, place skillet on the rack.  Broil for 2 minutes or until eggs are set and no longer glossy.  Cheese will start to bubble.


  •  After 2 minutes broil time.  Use a silicone spatula to loosen sides of omelet.  Slide omelet onto plate, folding in half.


  • Serve your blockbuster omelet to rave reviews.  No brown crusties, no runny insides.

Feb 8, 2012

Spiced Coconut Carrot Muffins

I sure am glad that Jesus loves the little ones....


...like her, her, her.

Because I wasn't feeling it this morning. Not after she got me up twice last night. And especially not after she peed on my lap while we were waiting for the tub to fill up. And while in the midst of typing this very paragraph I was interpreted by the sound of ripping. That is rarely a good sound. She was ripping up the contact cards in my Rolodex.

Outrageousness.

What's a mother to do?


Make these. That's what.  And solace your sorrows by stuffing your face with absolute yumminess.  Spell-check is protesting that yumminess is not a word.  I defy spell-check.  It is so a word.

The spice in these muffins remind me a little of Amish Friendship bread, but kinda like a faint memory, not very distinct.  The carrots are like nice background music with a melody of coconut.  Oh, nothing like a titch of coconut to cheer my day...

I altered this recipe to suit my taste and what I had on hand.  The presence of sourdough starter in my home is another story for another day, but if you don't have it, I'm pretty confident you could just leave it out or follow something like this for a guideline.

And if it's been an especially tough day, I would highly recommend a little cream cheese frosting to spread on these beauties. And a cup of tea, like Constant Comment.

Spiced Coconut Carrot Muffins
Makes 24-26 muffins

Ingredients:
1 cup vegetable oil
2 cups sugar
1 cup sourdough starter, unfed from the refrigerator
3 eggs
3 cups grated carrots
1 cup shredded coconut
2 tsp. coconut extract
2-1/2 cups flour
2 tsp. cinnamon
1/2 tsp. salt
1 tsp. baking soda

Directions:  Combine oil and sugar; stir in starter.  Mix in eggs. Fold in carrots, coconut, and coconut extract.  In a separate bowl, combine flour, cinnamon, salt, and baking soda.  Add dry ingredients to the wet, stirring just to combine.  Spoon batter into 24 lined muffin cups.  Bake in a pre-heated oven at 400 degrees for 18 minutes.  Remove from oven and cool completely on wire racks.